Saturday, May 21, 2011

Club Scrap Die Cutter’s Blog Hop!

Welcome to the Club Scrap Die Cutters Blog Hop!  Get ready  to see some awesome projects using a variety of die cutting machines and fabulous Club Scrap paper.

http://wbellino.blogspot.com/You Are HERE!!! http://craftchaos.blogspot.com/ (Go HERE next to see what Hetty has created!) http://www.pagesofpictures.com/ http://chrissiecreations.blogspot.com/ http://scraphappysistersink.blogspot.com/ http://www.capecodscrapper.blogspot.com/ http://www.creatingwithconnie.blogspot.com/ http://www.scrappingthoughts.com/ http://orezonia.blogspot.com/ http://squirrelyart.blogspot.com/

I just bought the Cricut cartridge Everyday Pop Up Cards,  and this was the perfect opportunity for me to rip open the box and start creating.  I immediately stuck the cart in my machine and chose an image to cut. I am used to making cards with the Just Because cartridge and usually use the Fit to Page feature,  if I’m not using my Gypsy. Hmmmm…. FTP didn’t work. The images ended up being huge and *GASP*  I wasted two sheets of my precious CS paper!  Before I screwed up anything else, I Googled the cart looking for some instructional videos. Turns out I wasn’t the only one having trouble with the cartridge. I found Crafting with Katie's blog and a video tutorial making a pop up card! She used her Gypsy to figure out the correct sizes of her images…duh!  Club Scrap’s monthly kit for May is Papillion (butterfly in French…*WINK*). I was inspired by one of CS’s members, Marilyn, who posted a 3-D butterfly card in CS’s forum. I decided to make a card using  the butterfly image… IMG_1192

I really liked the CS stamp “Beautiful Soul” from March 2011 and opted to use that instead of one of the die cuts in the cartridge handbook.


I wanted to make a 3-D butterfly for the front of the card, so I cut the butterfly images three times on vellum paper. I cut the overlay image  too and used cardstock from the Raku kit, also from March 2011.  The other cardstock is from the May 2011 Papillion kit.

 IMG_1188 IMG_1195

I love my Scotch Quick Dry Adhesive for gluing all the layers I cut with the Cricut! IMG_1193

The tricky part was trying to figure out how to adhere the pop up. I scored the pop up tab at each notch and had to play with it for a while to figure out “which way was up”! IMG_1198 IMG_1199 IMG_1201

I wanted the card to open left to right, not up and down. It took a little wrangling, but it ended up working like I wanted. IMG_1202 IMG_1203

Marilyn’s instructions were to “Peel adhesive off of one left wing and one right wing. Adhere. Repeat. You should have 3 butterflies stuck together. The center one has both wings attached to one other. Each one on the end has only 1 wing attached. Now peel off the last two pieces of adhesive and stick onto your original image on the card, matching exactly. Fluff the wings and you're good to go.” So I trimmed the antennae off two of the butterflies and glued them together… IMG_1204 IMG_1205

I love how it turned out…first try!  And of course, Stickles for bling! IMG_1207 IMG_1210 IMG_1211 IMG_1212   Oooohhh!!! I wanted to share this too… I made a light box for taking photographs for my blog. My craft room light is too “yellow” and I wanted the pictures to be brighter without having to photograph them in daylight. I bought some foam board and improvised, after I saw one on the internet for $75. Five pieces of foam board and some packing tape, less than $20.00. I rarely have to use my flash either.   IMG_1217 IMG_1218

Thanks for looking and be sure to scroll back to the top for the next blog hop link!

Read More »

Monday, May 16, 2011

Viva Las Vegas!

40th Birthday Dinner

My sisters and my oldest and dearest friend surprised me with a trip to Las Vegas for my 40th birthday. My sister travels often for business and has been to Vegas numerous times, so she tailor-made our itinerary.  It was an AWESOME trip! More pages to follow,I am putting a digital book together for each of them…

Read More »

Saturday, May 14, 2011

Die Cutter’s Blog Hop!

Read More »

Wednesday, May 11, 2011

Thank you notes….

001

Ooof! I hated sending thank you notes after graduation. I would take one look at that little white card and get overwhelmed. I have to fill up the whole thing???  I had a good laugh a few years ago when my cousin sent me a thank you note for her graduation gift…” Thanks for the cash. I’ll try not to spend it on something that will make my parents worry.”  I think I still have that note somewhere! 

Creativity, limited writing space = CUTE card! I used my Just Rite Monogram Stamp inked with  Rangers Big and Bossy ink pad and embossed with gold embossing powder. I found a circle punch that was the perfect size to punch the finished images out, so I don’t stress over getting the image straight! I corner chomped with the Crop-A-Dile corner chomper. Done…

Read More »

Saturday, May 7, 2011

Mother’s Day 1969

Mother's Day 1969_edited-1
I posted the small picture of my Mom and I as my profile picture on Facebook as a Mother’s Day tribute. I encouraged her to tell the story of it on my FB page as a comment on the picture. I have heard the story many times, but I always like when Mom tells it. My Dad saw the picture and tried to find the original newspaper article that went with it, (Mom has it tucked away somewhere!) Since he couldn’t find it, he contacted the Associated Press to see if he could get an original copy of the clipping. They emailed it to him in four pieces! He sent it to me to put something together for her…this is what I ended up with! I love it. I think if I had asked her to write the quote for the layout, it wouldn’t have been as perfect.
Happy Mother’s Day to all of you!
Read More »

Sunday, May 1, 2011

Beau’s Baptism Card


My niece was  baptized today!  She wore the christening gown that my 86 year old Memaw handmade for me 42 years ago. I have a house full of boys. Maybe one day I’ll have granddaughters who will wear it. It was definately made with love.

Sweet girl…she smiled the whole time.

IMG_1167

Of course the gift I am in the process of making for her isn’t ready (I am famous for this!), so I made her a card for the occasion…

IMG_1150

I made my own iris folding template! I am so proud! I drew the christening gown outline and with the help of the instructions on the Simplicity of Iris Folding site,  I made my template. IMG_1142 IMG_1144

Big feat for me…cutting out the design with a craft knife!

I used the metallic opal vellum paper from the  Club Scrap Vogue kit and the blue cardstock is from the Lotus Pond kit. I made the quilled roses…it’s been a long time since I have done it! I used pearl metallic fabric paint for the faux pearls.

 IMG_1154


IMG_1145

I uh, forgot to ink the edges…I masked it with my cut out. It worked. It would have looked better if I had done it before I finished though!

I have designed a quillling piece that I am making for her gift. Maybe I’ll have it finished before HER children are baptized!

Read More »

Sunday, April 10, 2011

Digital Scrapping….begin at the beginning

“Begin at the beginning and go on till you come to the end: then stop.” ---Alice in Wonderland

I appreciated digital scrapping and have attempted some simple layouts, but my PSE software is Greek to me. I watched a few tutorials  and learned enough to make a few pages, but I am the person who likes to read the instructions from front to back. When I start in the middle I feel scattered and disorganized. I found the beginning when I found the video tutorials on the Scrapper's Guide website ! It is basically PSE digital scrapping for dummies. I NEEDED to know what all the tricks and techniques were, I am not a drag and drop digital  scrapper. I love scrapping with paper, but learning how to do all the digital tricks has opened a whole new creative window for me!   There is a charge for the classes, but you get a discount if you join as a Premier member. I just paid for the classes. I am a huge fan of Club Scrap and have enough digital kits to keep me busy for a long time, though the digital scrapbook kits offered on the Scrapper’s Guide site are fabu! The classes can be accessed repeatedly or downloaded and there is also a PDF file for each.  This is a huge plus for me, I gotta SEE it. It is so nice to have the instructions printed out to follow along while you’re working. Club Scrap has some fantastic digital tutorials on their site, but you really need a working knowledge of PSE to attempt the projects. I can’t wait to apply all my new knowledge so that I can tackle those advanced projects!

Read More »

Monday, February 14, 2011

I "ink" I love you Club Scrap!

Welcome to the "spread the love" blog hop!  We are spreading the love of Club Scrap!  The challenge was to post a project, tutorial, or layout focused around Club Scrap products. The materials I am going to be using are from the Love Inkcorporated Special Release Valentine Collection from Club Scrap.  

A few years ago, I was tooling around looking for new art techniques to try and found an elementary school art teacher's lesson plans. She had posted pictures of before and after and the results were dramatic! I had to try it...I sketched out this picture of parrots and followed her instructions and voila!


Since I wanted to use this technique for the challenge, Club Scrap carries Faber-Castell watercolor gelatos (kinda like watercolor crayons, but smoother and comes in a really cool lipstick like container!). That is what I'll be using instead of tempera paint from the lesson plans link above. 

Materials List:
3*4" piece of CS (Club Scrap) cardstock from the Memoirs kit
Watercolor gelatos
UM (Unmounted Stamps) Love Inkcorporated stamps
CS sandstone ink (very light)
Speedball waterproof India ink
Foam brush
Krylon gold leafing pen
4.25*11" piece of black cardstock scored in half horizontally to make a 4.25*5.5" card
3.25*4.25 " piece of red cardstock to matte
4*5.25" piece of red cardstock for the card liner
Tim Holtz grunge board die cuts
Tim Holtz Distress ink in Vintage Photo
Tim Holtz Crackle paint in tarnished brass
Adirondack paint dauber in gold


I stamped the UM heart with the keyhole onto the white cardstock.

Color in with the gelatos, but leave space between the colors.
This is what it should like. See all the white space?

Using a waterbrush or paintbrush with water, blend the gelatos...leave the white space! 
Dry with a heat tool, or let it air dry before this step.  Get a foam brush and the India ink...
Brush the entire piece, yes completely cover, with India ink!
Let this dry for about 30 minutes.  Rinse under cool water and gently rub with your fingers to remove the ink.  Don't "scrub" it, be gentle.  It's like magic, your picture appears with detail!
It is going to be sopping wet, so don't let it lie flat.  Shake off the excess and let it dry on an incline or dry it with a heat tool. 

I cut out the heart with a craft knife and painted my die cut grunge pieces. 


I distressed the edges of the cardstock with a Tonic distressing tool from CS. I inked the edges with the distress ink and layered all my pieces. I popped the heart up with black Scrapbook Adhesives foam squares from CS. I glitzed it up and rubbed the edges of the cardstock with the leafing pen. I stamped "True Love" UM greeting with the gold dauber...


Check out the other CS artists!

Blog Hop Order...

Cape Cod Scrapper
Creating with Connie
Crzymom's Tidbits
Juju's Folly
Lift Bridge Cards and Crafts
Making Impressions
My Artistic Escape
Orezonia
Pages of Pictures
Scrap Happy Sisters, Ink.
SquirrelyArt
Where the "ArT" is... --ME! You are here!

Also linked to
Click here for the link party!
Read More »

Monday, February 7, 2011

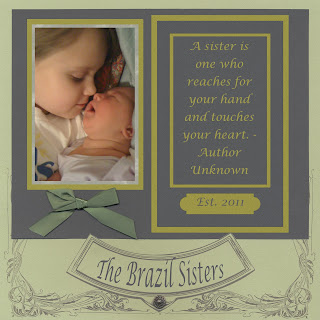
Sisters....

This is my favorite.  Club Scrap Generations digital kit.


Read More »

Experimenting...

I've been experimenting a little with digital scrapbooking.  I was afraid of it at first because Photoshop Elements was daunting!  Club Scrap has some fantastic digital kits and tutorials for beginners thru advanced, and I also found some more today from DCWV/dpi.com . I initially ordered my first digital kit so that I could duplicate scrapbook pages for my sisters and my best and oldest friend who treated me to a Las Vegas trip for my 40th birthday.  (I still haven't scrapped them and I will be 42 in March....shame on me!) For my first layout, I used one of the templates in a kit I ordered a few years ago called Generations from Club Scrap.  My sister just had her second baby January 14, 2011 and my parents and I were waiting patiently for her to arrive...


I added the tag, the text, and the brad....yah me!!!  All this after I watched all of the video tutorials.....thanks Jac!
Read More »

Sunday, February 6, 2011

Just playin'...art journal entry

I bought some Faber-Castell watercolor gelatos from Club Scrap to stamp with.  I really like them better that watercolor crayons.  They are smooth....I also bought some oil pastels after I saw a video using them to color in a stamped image.  I really like that look.  I made some samples that I added to my art journal....I feel some fun projects coming on.


Read More »

Saturday, February 5, 2011

Valentine's Day gift bags!

I had so much fun making up these Valentine's Day gift bags for my nieces and nephews.  They are all still little...I made the heart shaped bags and the popcorn box with my Cricut and the Tags, Bags, Boxes and More cartridge.  The papers are from K & Company.  I couldn't resist buying Lip Smackers for the girls! I used to love that stuff when I was a kid.  My sister and sister-in-law wanted some too when I called to ask about flavors! Aaaaaahhhhh memories....


Spider Man is hiding in the "grass"!


 I saw these really cool Martha Stewart fringing scissors today and of course I had to get them.  You can never have too many scrapbooking supplies...right???  My new fun gadget! I'll have to invent things to use them for!
 

Read More »

My Smash journal....

After I saw the EK Success video for the new Smash Journals I was inspired! I have a bunch of old notebooks that I needed to put to use, so I made my own....


I love this Graphic 45 paper...


Now, to make myself write in it regularly!  I am so bad about that! I like the idea of just jotting things down, maybe attaching a card that I received from an old friend, notes about things that my kids said or did,  maybe add a photo, newspaper clipping, instead of a full scrapbook page that I may not get to for years...I read somewhere that in my lifetime I will never have time to scrapbook the pictures that I already have, let alone ones that I haven't taken yet.  Journaling like this will make me feel like I am doing something and leaving little pieces of me...
Read More »

Sunday, January 23, 2011

Kiss Me!

Kiss ME!

I love how this turned out!  I am a fan of Valita at http://valitasfreshfolds.blogspot.com/ . This is an iris folding pattern project she showcased on her blog for Valentine’s day. I downloaded the pattern and used Club Scrap inks and papers (except for the gold glitter paper!).  This was my first attempt to cut an image out with a craft knife.  Not as hard as I was making it out to be. I also used my Cricut and Nestabilites.  I am gonna have to mass produce these for Valentine’s Day! 

Read More »

Friday, October 8, 2010

Trick or Treat!!!

I made these treats for the Fall Festival at my son’s elementary school.  Yum!  Graveyard cake (had to throw some Cricut in there!  Happy Hauntings font), and Mini Monsters cookies!  I used my Gypsy for the designs, love that thing.  I broke down and bought one and soooo glad I did.  It makes using the Cricut so much easier.  Now, to tackle the Happy Hauntings 3D Haunted House! 

IMG_0215IMG_0221 IMG_0222IMG_0218IMG_0220

Read More »

I think you are Super Girl!

I broke down and bought a Gypsy.  I have been obsessed with my Cricut and this was the icing on the cake! Love it!  I made this card for my cousin’s 15th birthday.  She is the coolest kid!  Bouncy, happy, and a little goofy….just like me!  I designed this card for her using the Gypsy and used CS cardstock, Expressions, Gratitude, Cyprus, and used Paper Doll Dress Up and Billionaire Cricut cartridges.  I used the Gypsy to weld the font together.  My first try at “ribbon ruffles”, so cute!  Happy 15th Birthday Morgan!

img153 img154

Read More »